
This collection contains ten filled-in fingering charts for band instruments. They are references for reading notes and their key, valve or slide patterns, rather than blank worksheets for drawing your own diagrams. Each chart offers a Word template in DOTX format, an ODT file and a linked Google Docs version.
Start with the instrument and part in front of you. Choose the matching chart, then read the note’s staff position with that chart’s legend. A familiar note letter or a similar-looking diagram is not enough to establish that the reference fits your instrument.
Check your instrument and music before choosing a chart
Confirm the instrument’s key or system where applicable, the clef and register of the part, and how the chart represents its controls. The table is a navigator for the ten references below. It describes what each graphic shows; it does not establish compatibility with every model or notation convention.
| Instrument | What the reference shows | Check before use |
|---|---|---|
| Baritone | Bass-clef notes, partial rows and valve patterns | Notation convention and valve setup |
| Bassoon | Note groups with thumb, whisper-key, half-hole and pinky labels | Small instructions beside the note |
| Clarinet | Register, hand, throat and pinky markings | Instrument system and register |
| Flute | Key patterns and alternate B-flat information | The entry and its alternate labels |
| French horn | Single F and double F/B-flat columns | Which horn and column apply |
| Oboe | Octave, half-hole, side/thumb and pinky annotations | Note-specific instructions |
| Saxophone | Palm, hand/pinky, octave-key and alternate markings | Saxophone type and written part |
| Trombone | Bass-clef notes, partial rows and slide positions 1–7 | Note, register and slide-position entry |
| Trumpet | Treble-clef notes, partial rows and valve combinations | Staff note and combination together |
| Tuba | Bass-clef notes, partial rows and fourth-valve alternatives | Instrument key and valve setup |
For a first check, choose one note you can identify in the music and locate its complete entry. If the instrument type or chart convention is uncertain, ask your teacher to confirm it before following the patterns.
The ten instrument charts
Baritone
The baritone graphic places a bass-clef note stack against partial rows and valve patterns. Partial rows show groups of notes associated with the brass instrument’s harmonic series; this is why a valve combination must be read with the staff note. Gray fourth-valve alternatives appear in the reference too.
Check the notation convention and your instrument’s valve setup. A title that says “baritone” does not make every baritone or euphonium part interchangeable.
Baritone Fingering Chart
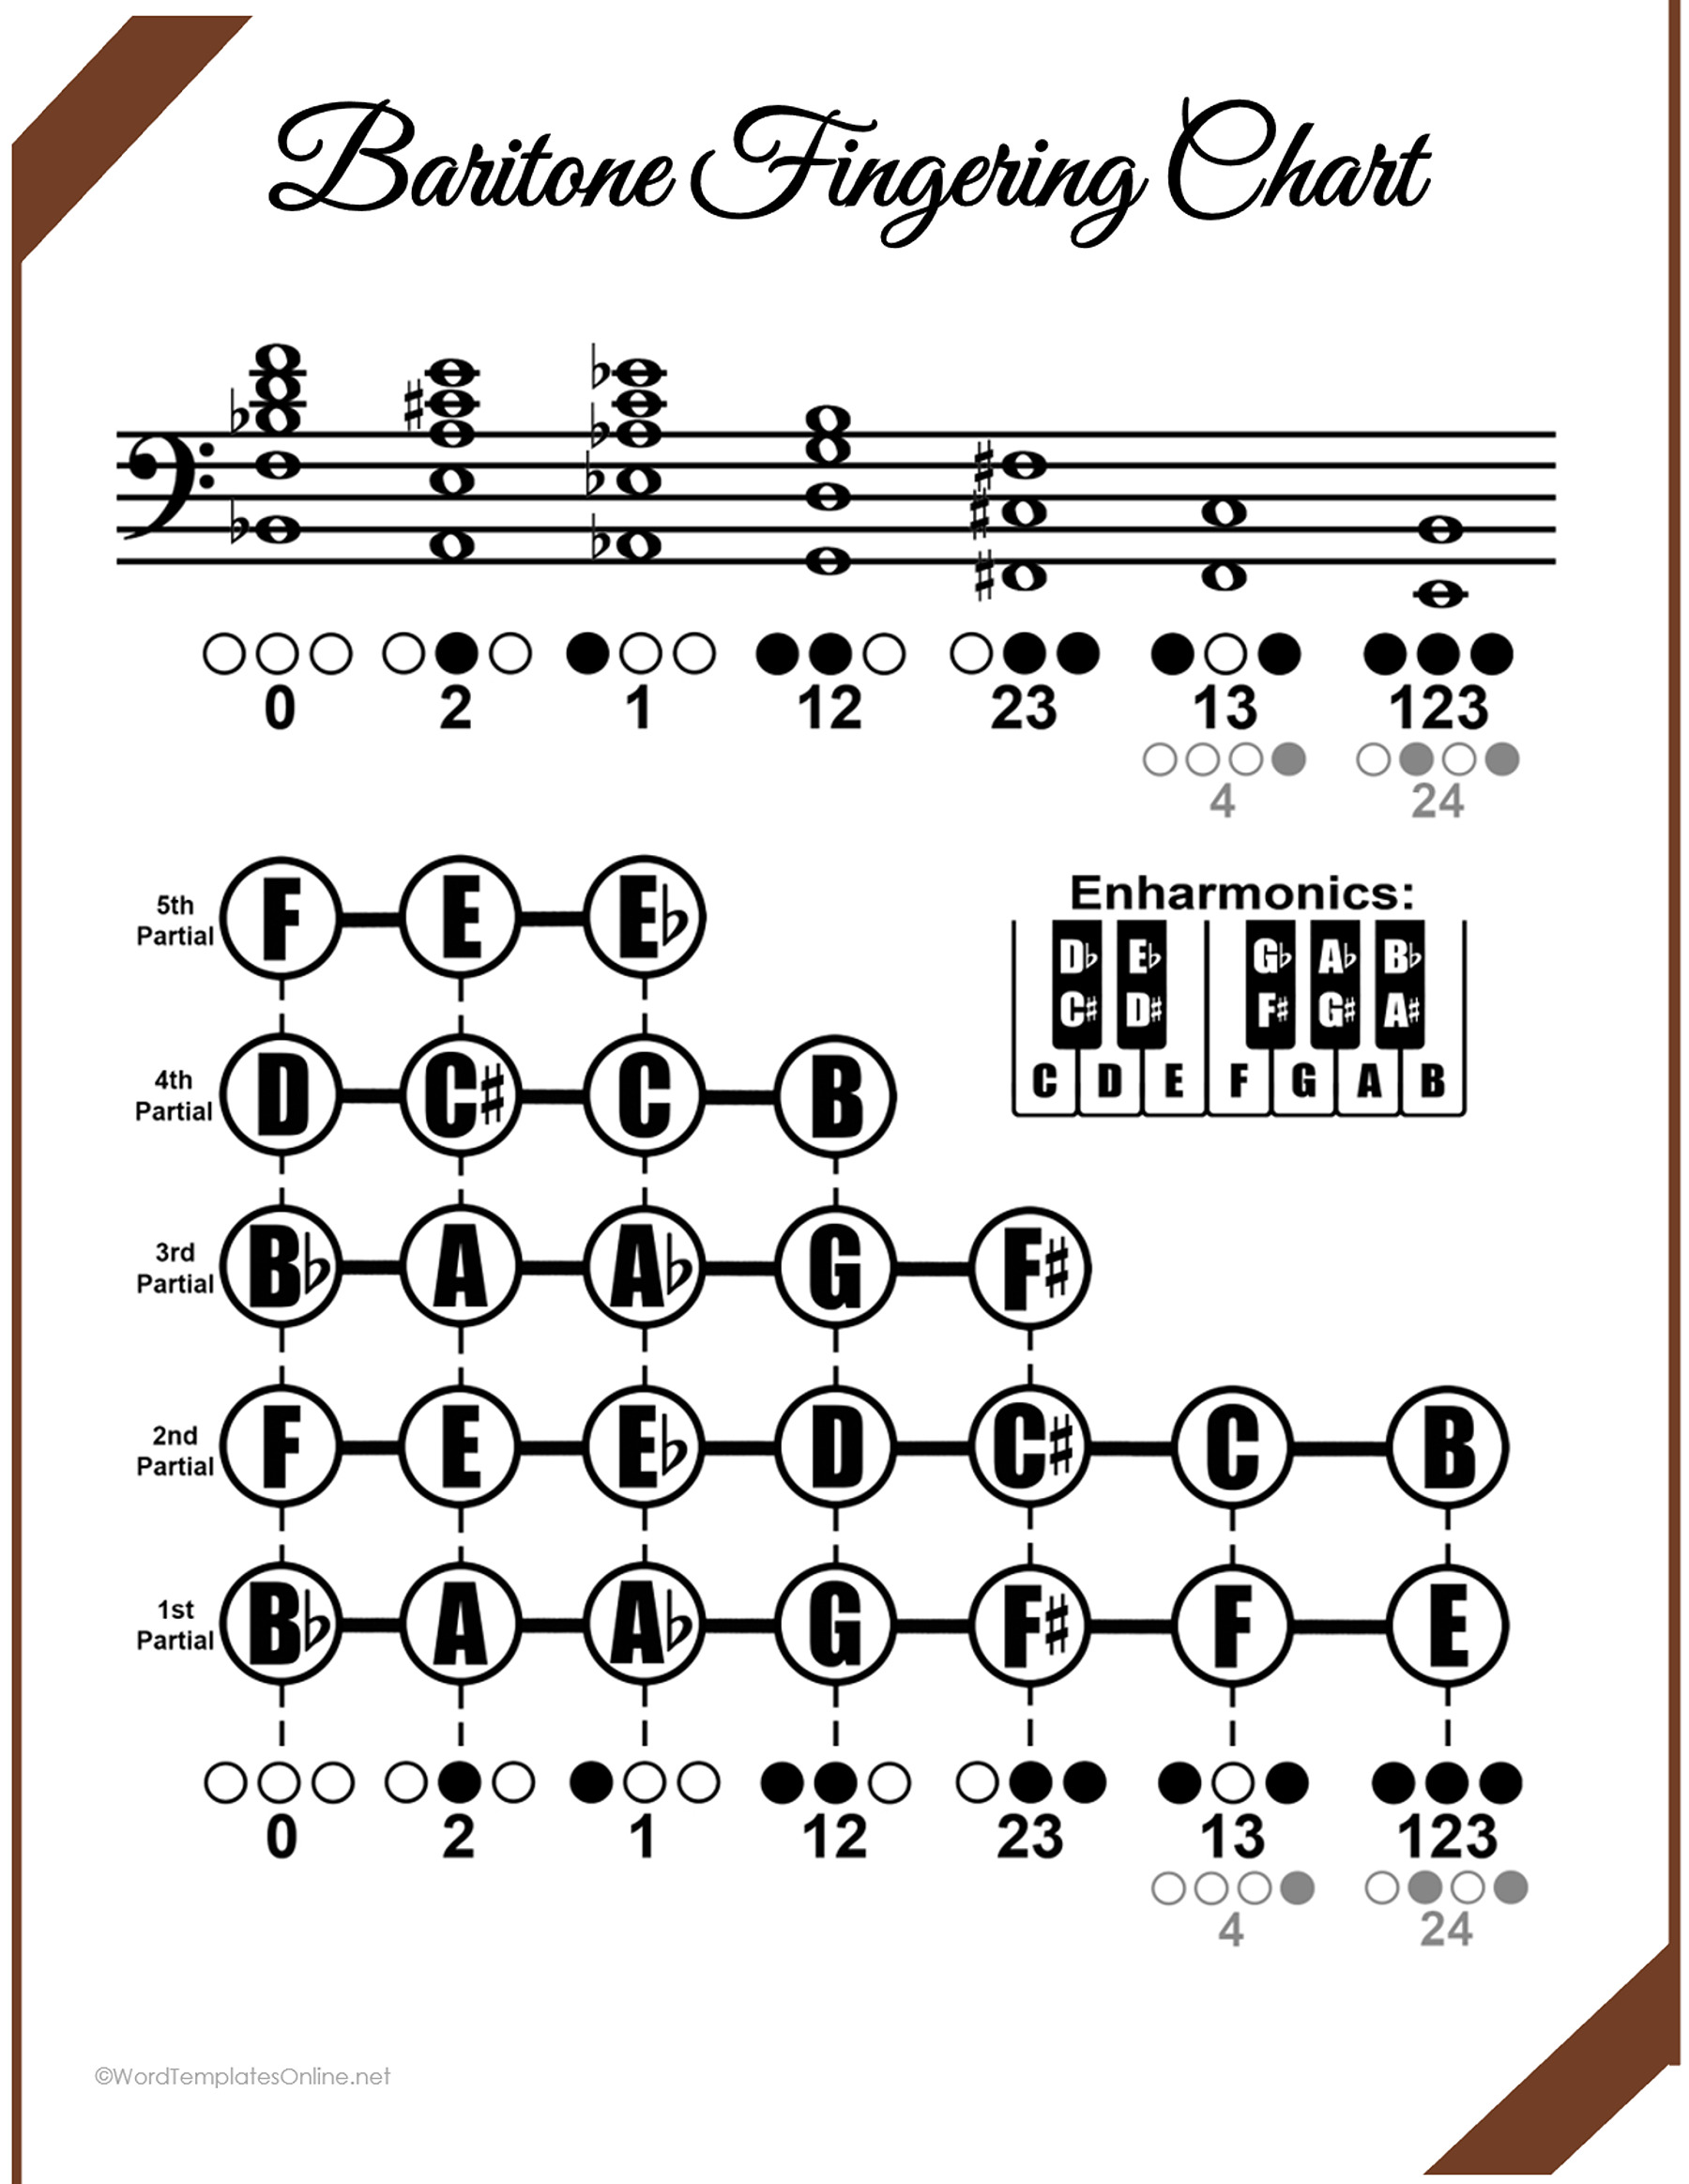
Baritone Fingering Chart
Bassoon
The bassoon chart groups staff notes with key diagrams and small instructions for the thumb, whisper key, half hole and pinky. Those annotations belong to the fingering entry, so don’t read only the larger circles and leave the small labels behind.
Locate the note first, then follow its diagram and accompanying instruction. Use the chart for clearly identified entries rather than assuming it covers every instrument system or advanced alternate.
Bassoon fingering chart
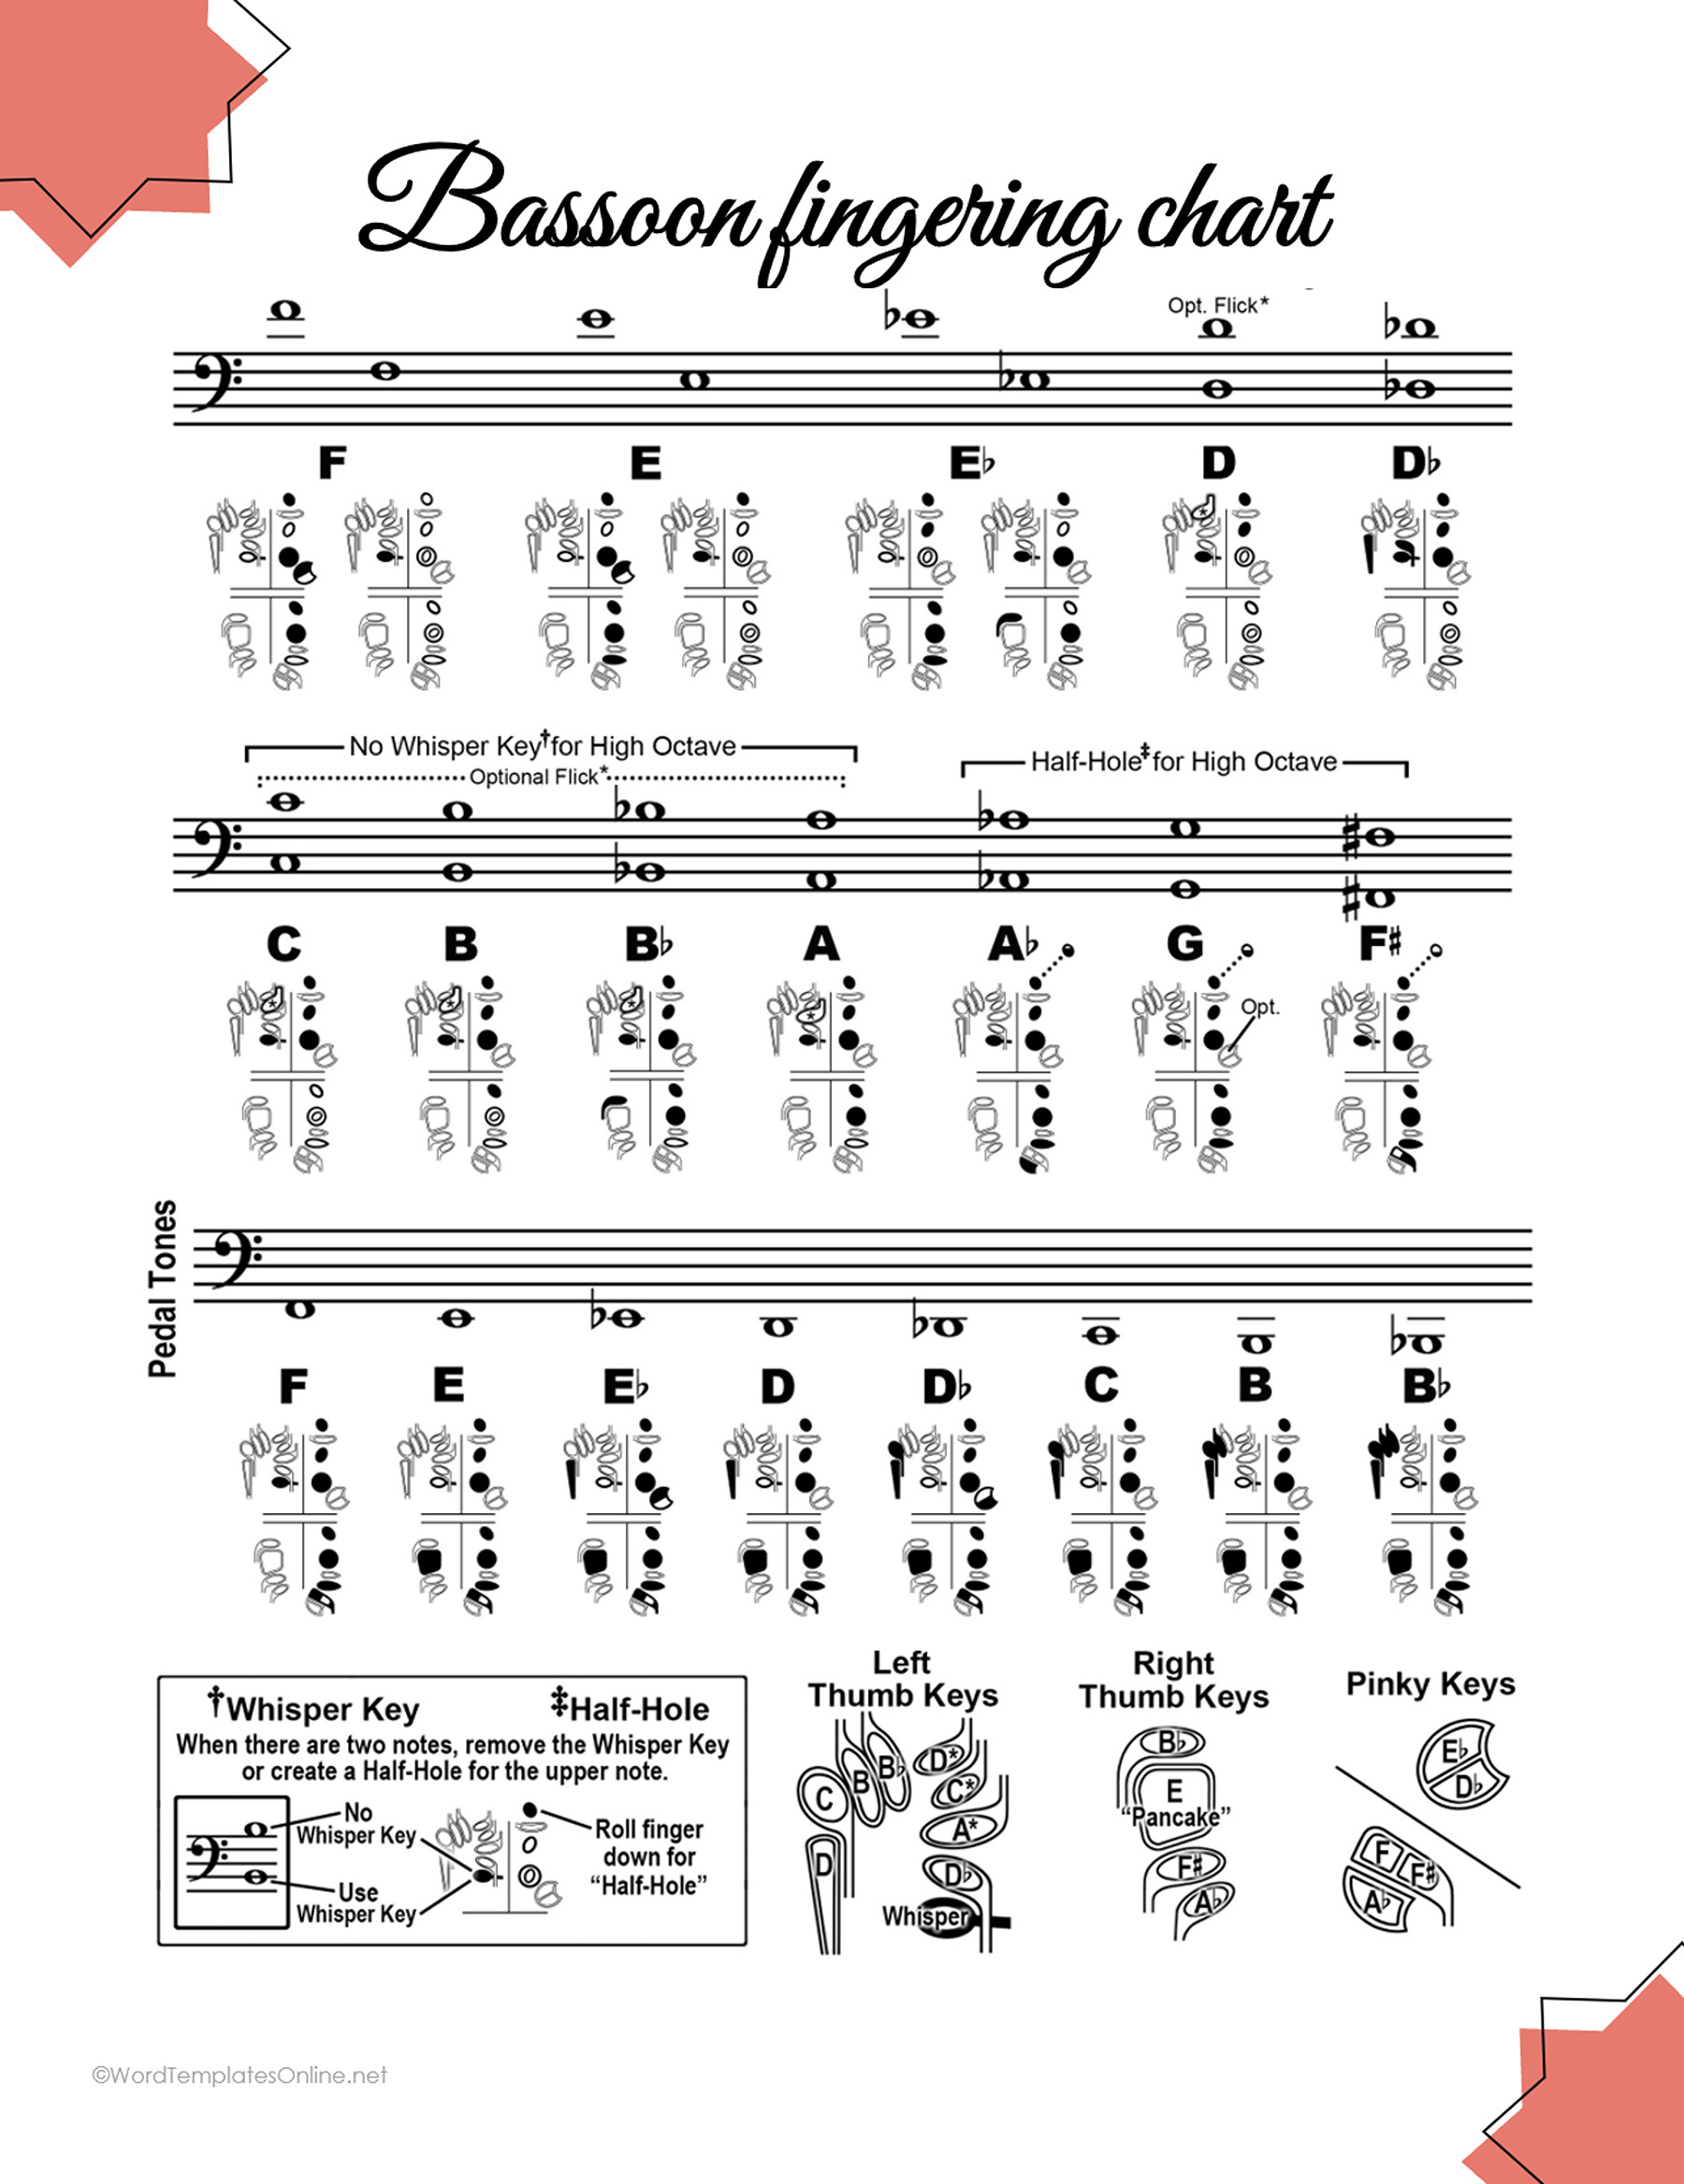
Bassoon fingering chart
Clarinet
This reference distinguishes chalumeau and clarion register information and shows left- and right-hand, throat and pinky markings. A register label helps you find the right part of the chart when similar-looking note names appear in different ranges.
Check the clarinet system before applying a pattern. Yamaha’s clarinet fingering diagrams, for example, explicitly identify their Boehm-system scope. Use that kind of scope statement when comparing references; a matching instrument name alone may leave an important detail unsettled.
Clarinet Fingering Chart
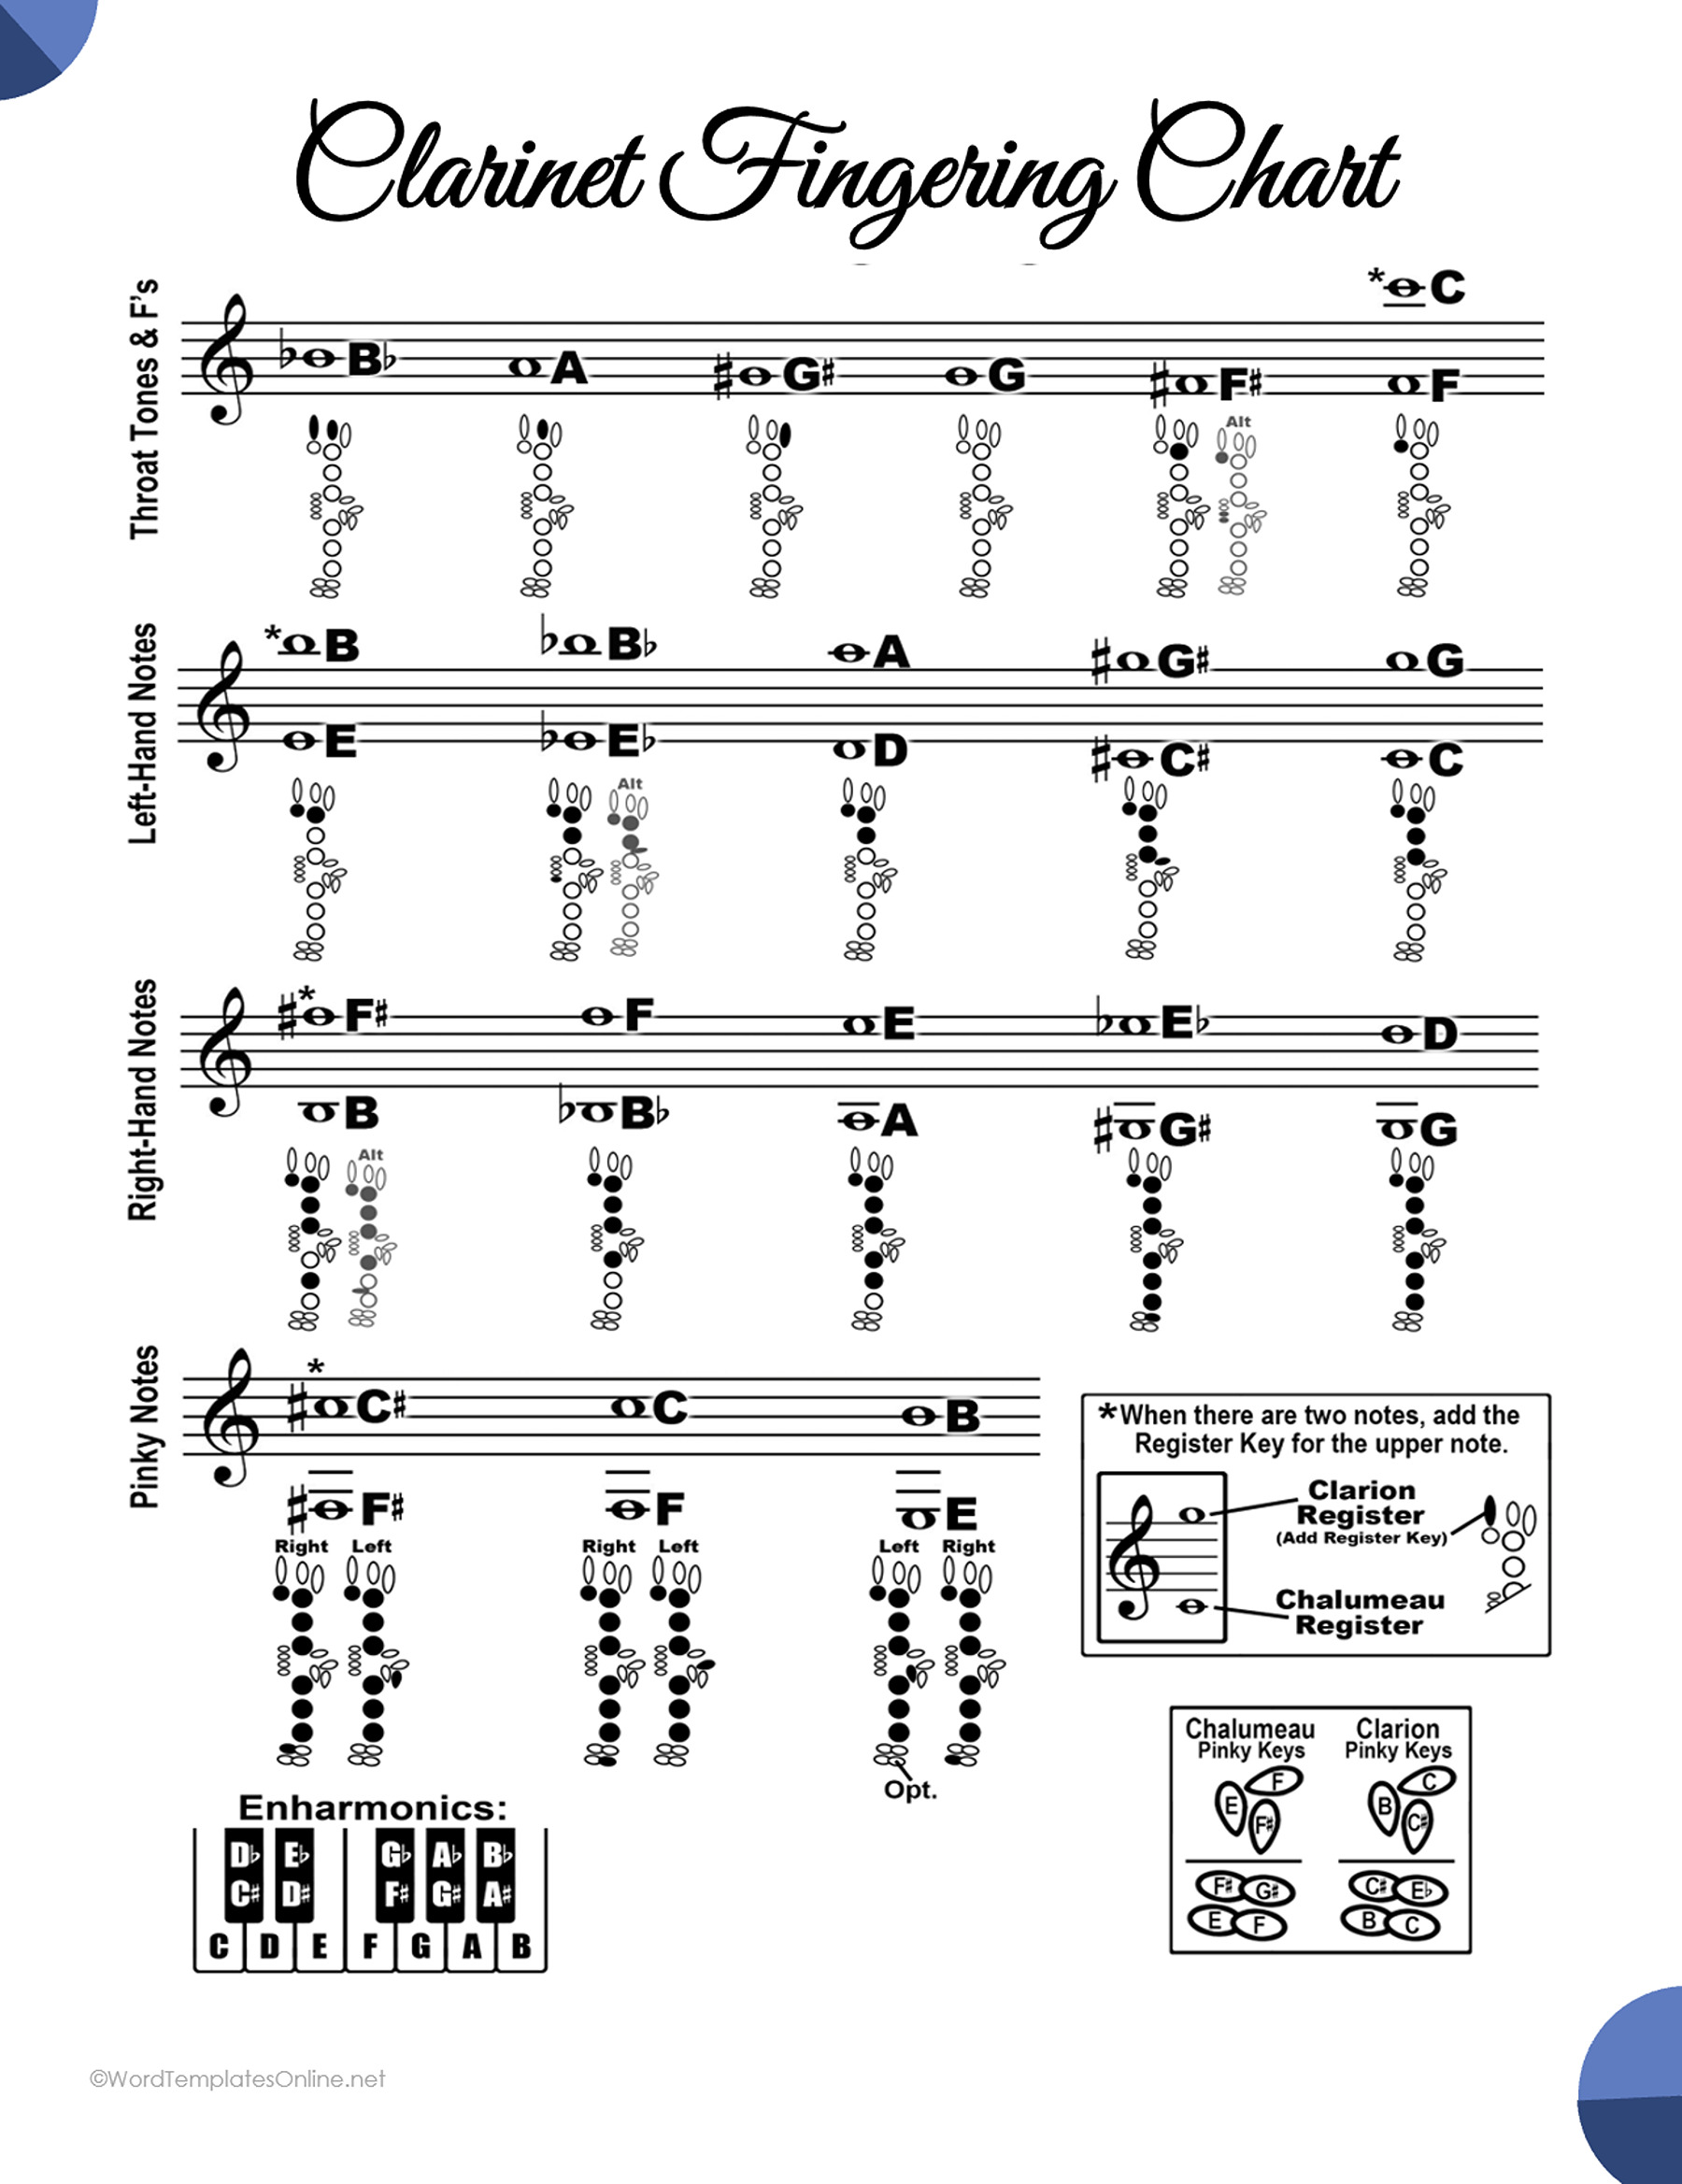
Clarinet Fingering Chart
Flute
The flute chart links notes with key diagrams and includes alternate B-flat information. Read the alternate label with the entry instead of treating two patterns as an instruction to combine them.
Yamaha’s flute diagrams also distinguish alternative fingerings. Your teacher can help identify which entry applies in context. This collection does not establish transposition coverage for every piccolo, alto or bass-flute part.
Flute Fingering Chart

Flute Fingering Chart
French horn
The horn graphic separates Single Horn (F) from Double Horn (F & B-flat) information. It includes T-labelled combinations and partial groups, so selecting the right column comes before interpreting a valve pattern.
For example, a player using a single F horn should begin with the single-horn column. The double-horn entries should not be treated as interchangeable merely because they sit beside it. Yamaha’s horn fingering guide provides separate context for double-horn use and alternative entries.
This is the French horn reference in the collection. It does not establish that the same diagram applies to a mellophone.
French Horn Fingering Chart
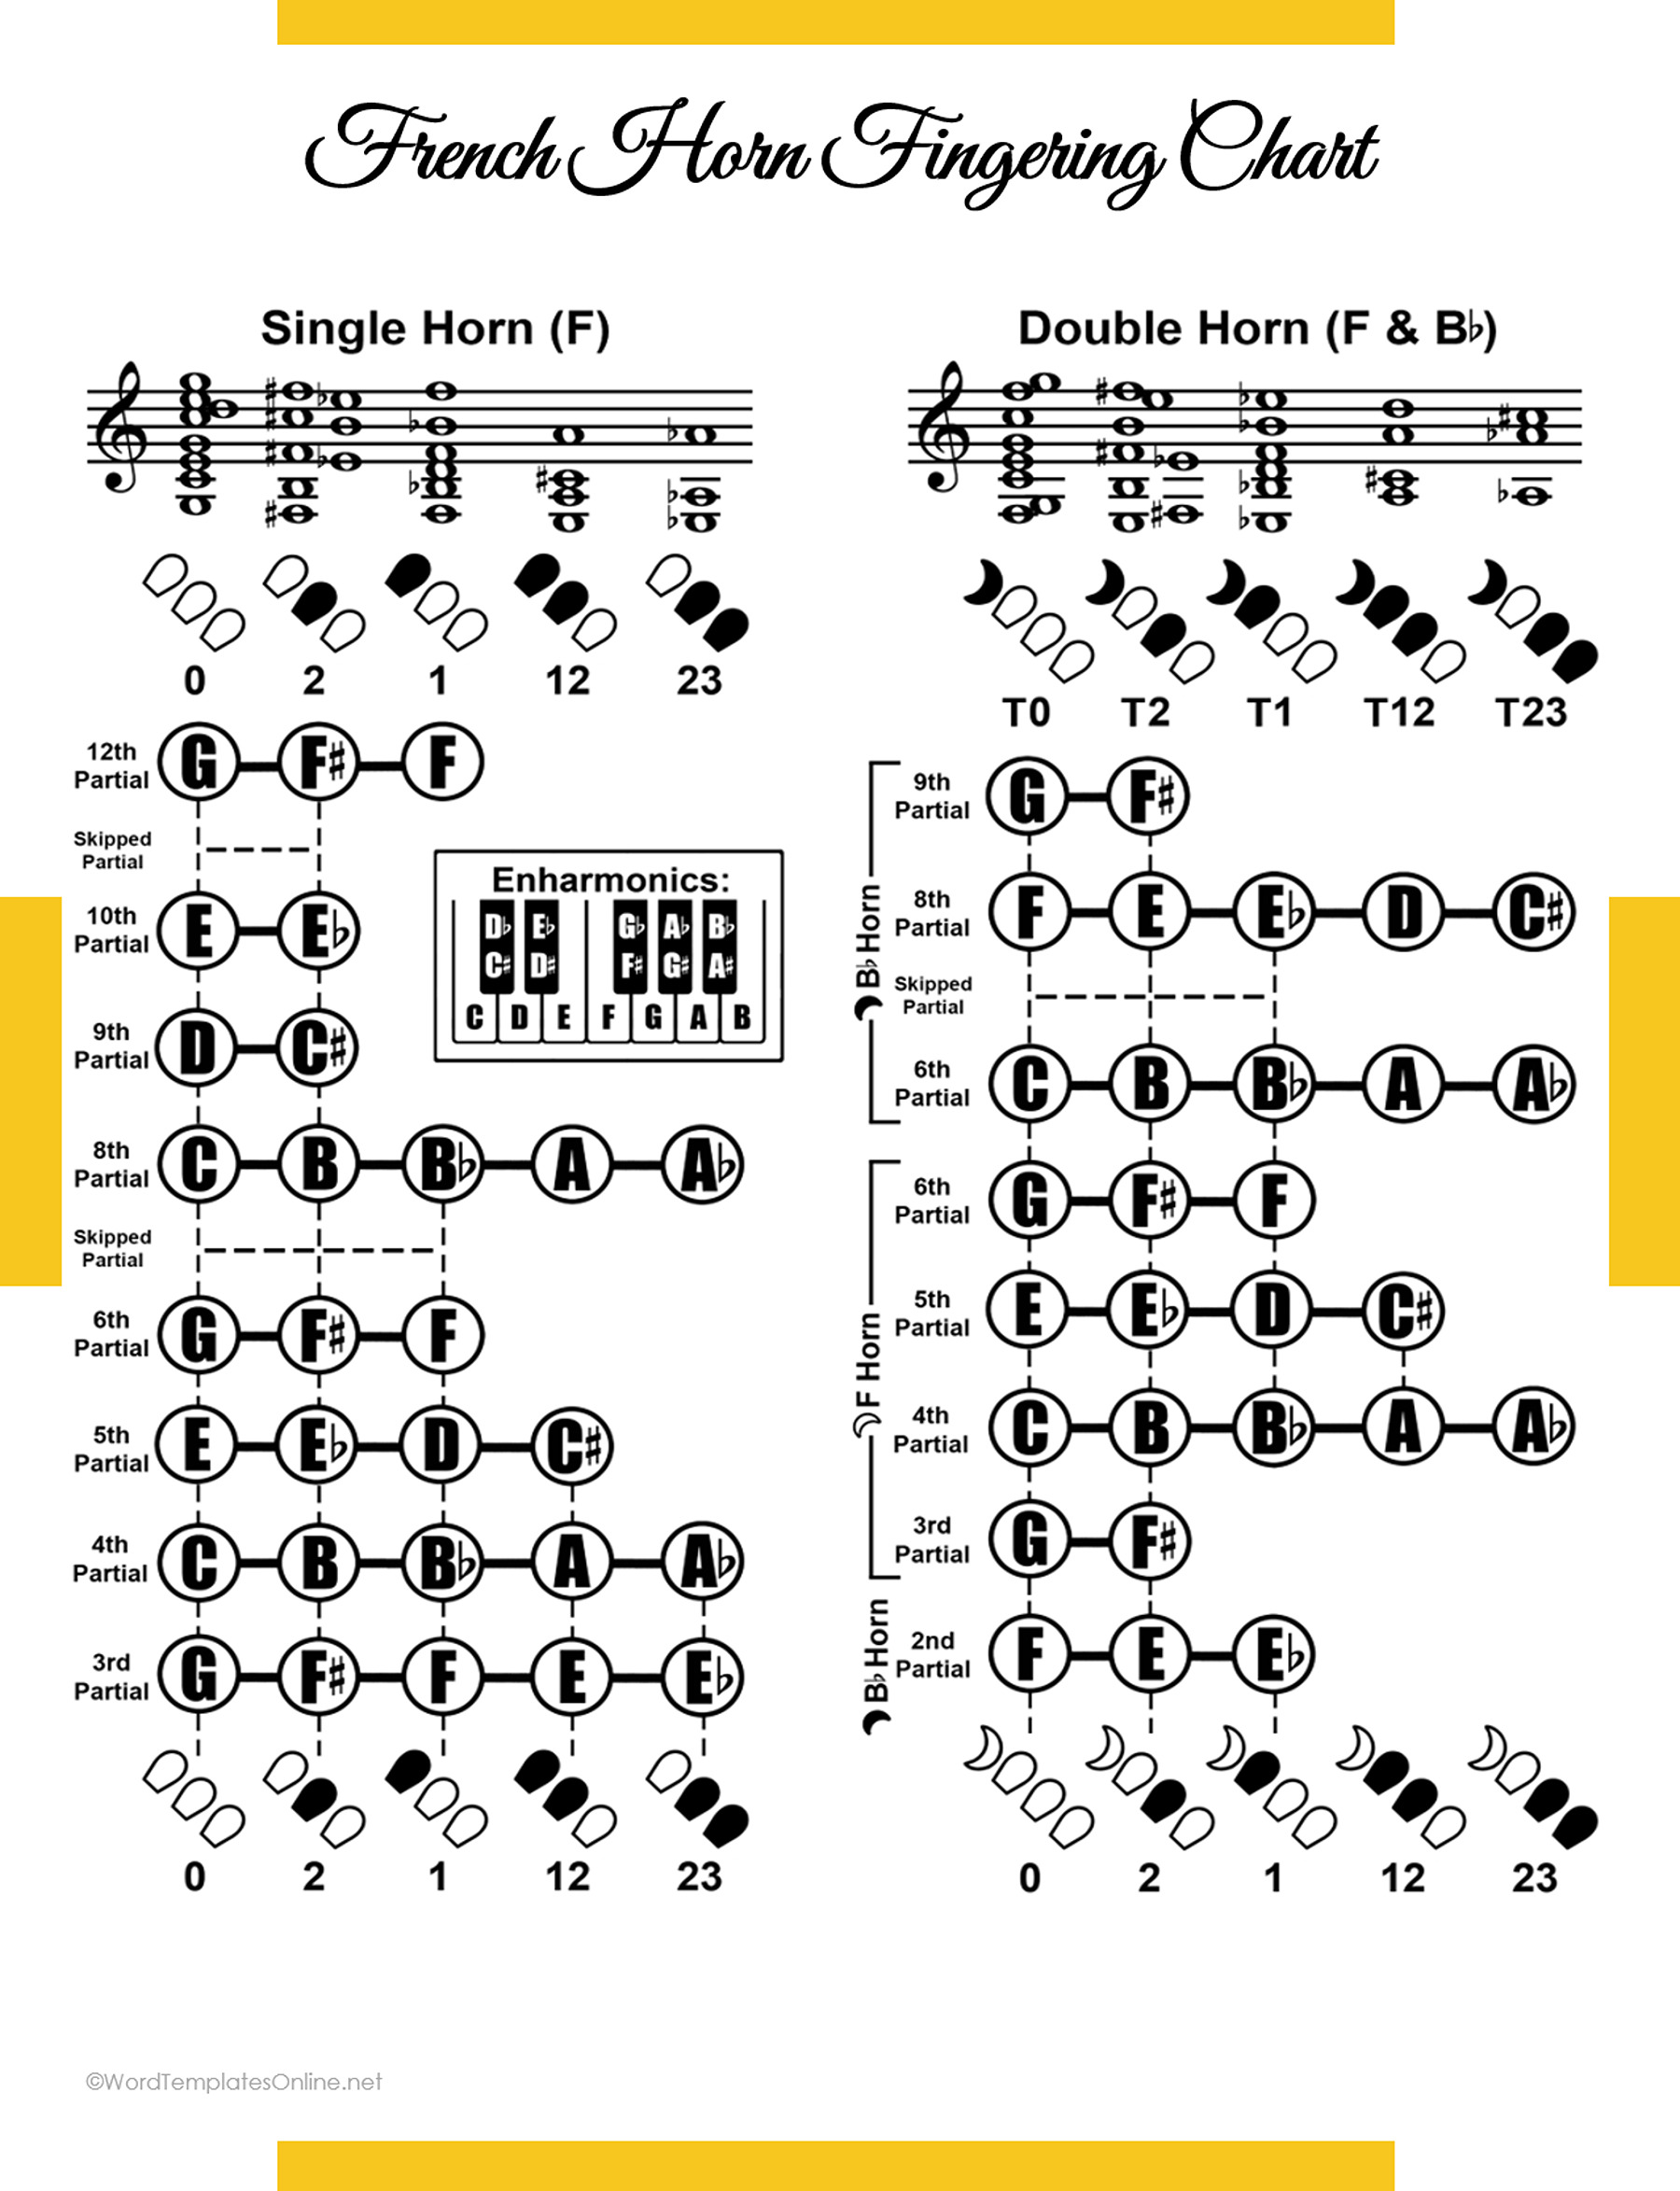
French Horn Fingering Chart
Oboe
The oboe entries include octave, half-hole, side/thumb and pinky annotations. Keep each small instruction with the note it accompanies. That is more useful than choosing a diagram from the note letter alone.
The reference retains its StepWise and fingeringcharts.org credit. Check how the entry applies to your instrument rather than assuming every model has the same relevant keys.
Oboe Fingering Chart
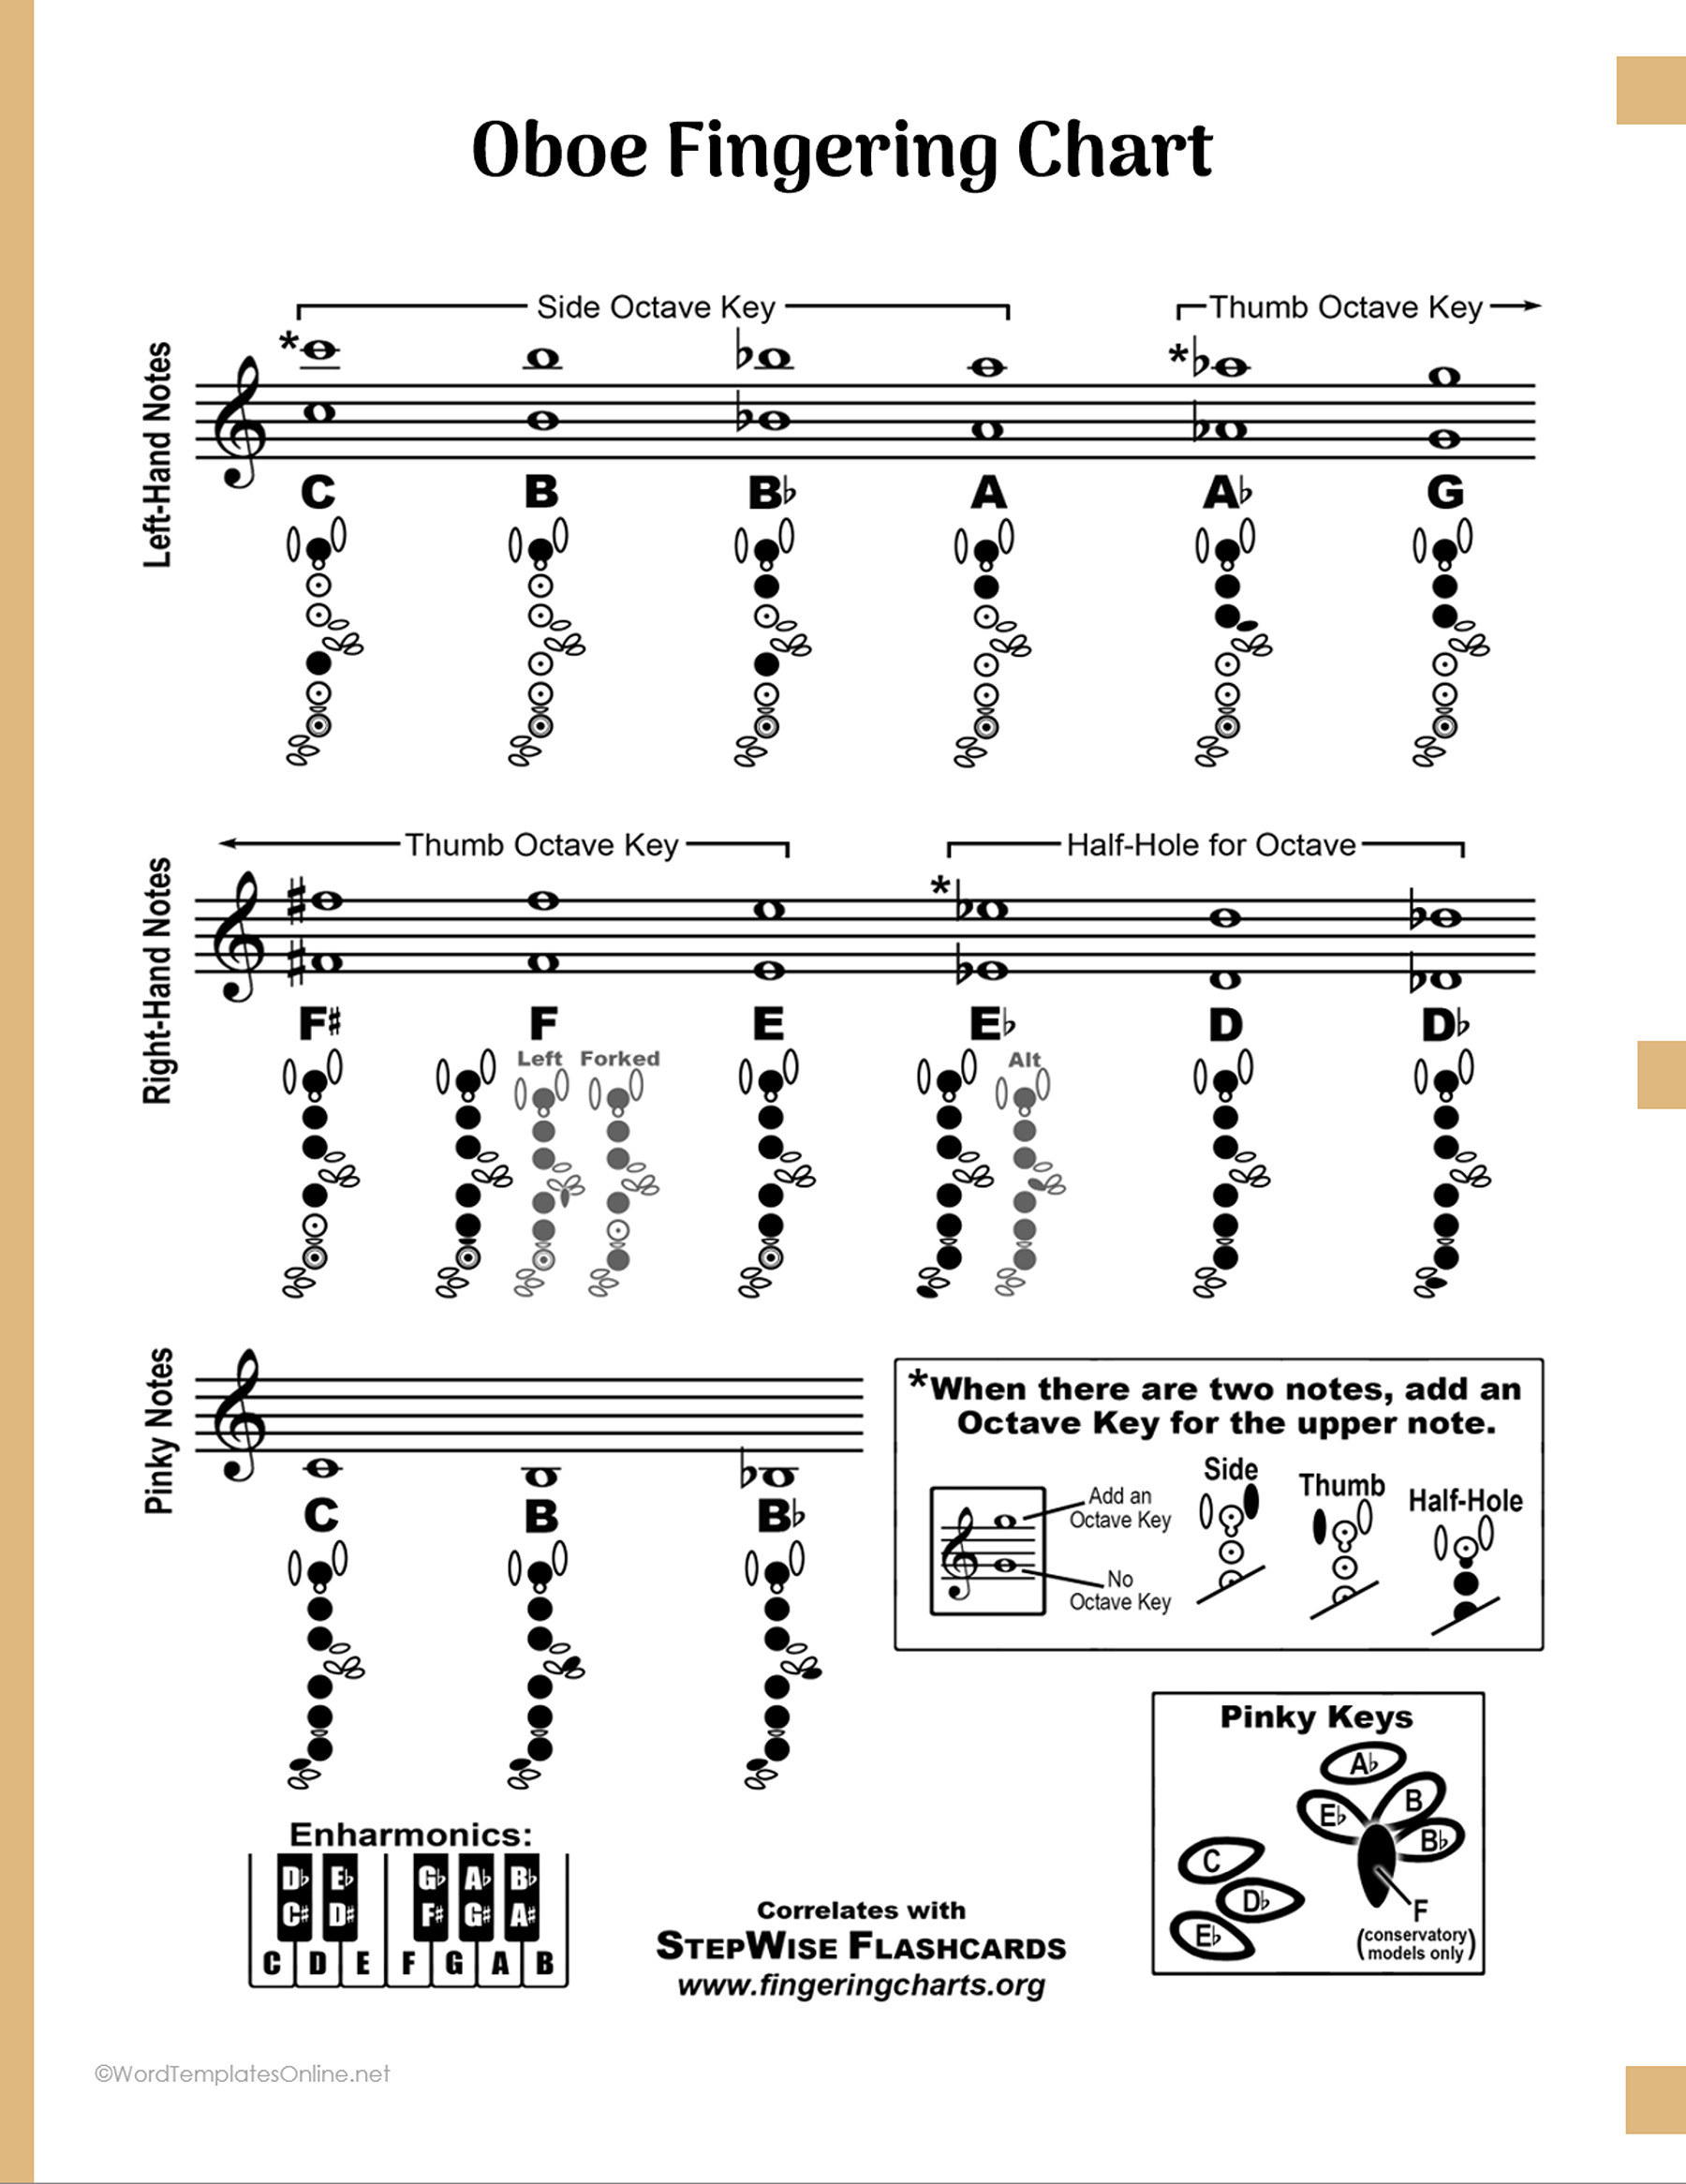
Oboe Fingering Chart
Saxophone
Palm keys, hand and pinky groups, octave-key markings and alternate labels appear in the saxophone graphic. Begin by finding the written note, then include the additional key instructions in your reading of the pattern.
A shared-looking key diagram does not mean that different saxophones produce the same sounding pitch from the same written note. Keep the saxophone type and the part’s notation in view when selecting a reference.
Saxophone Fingering Chart
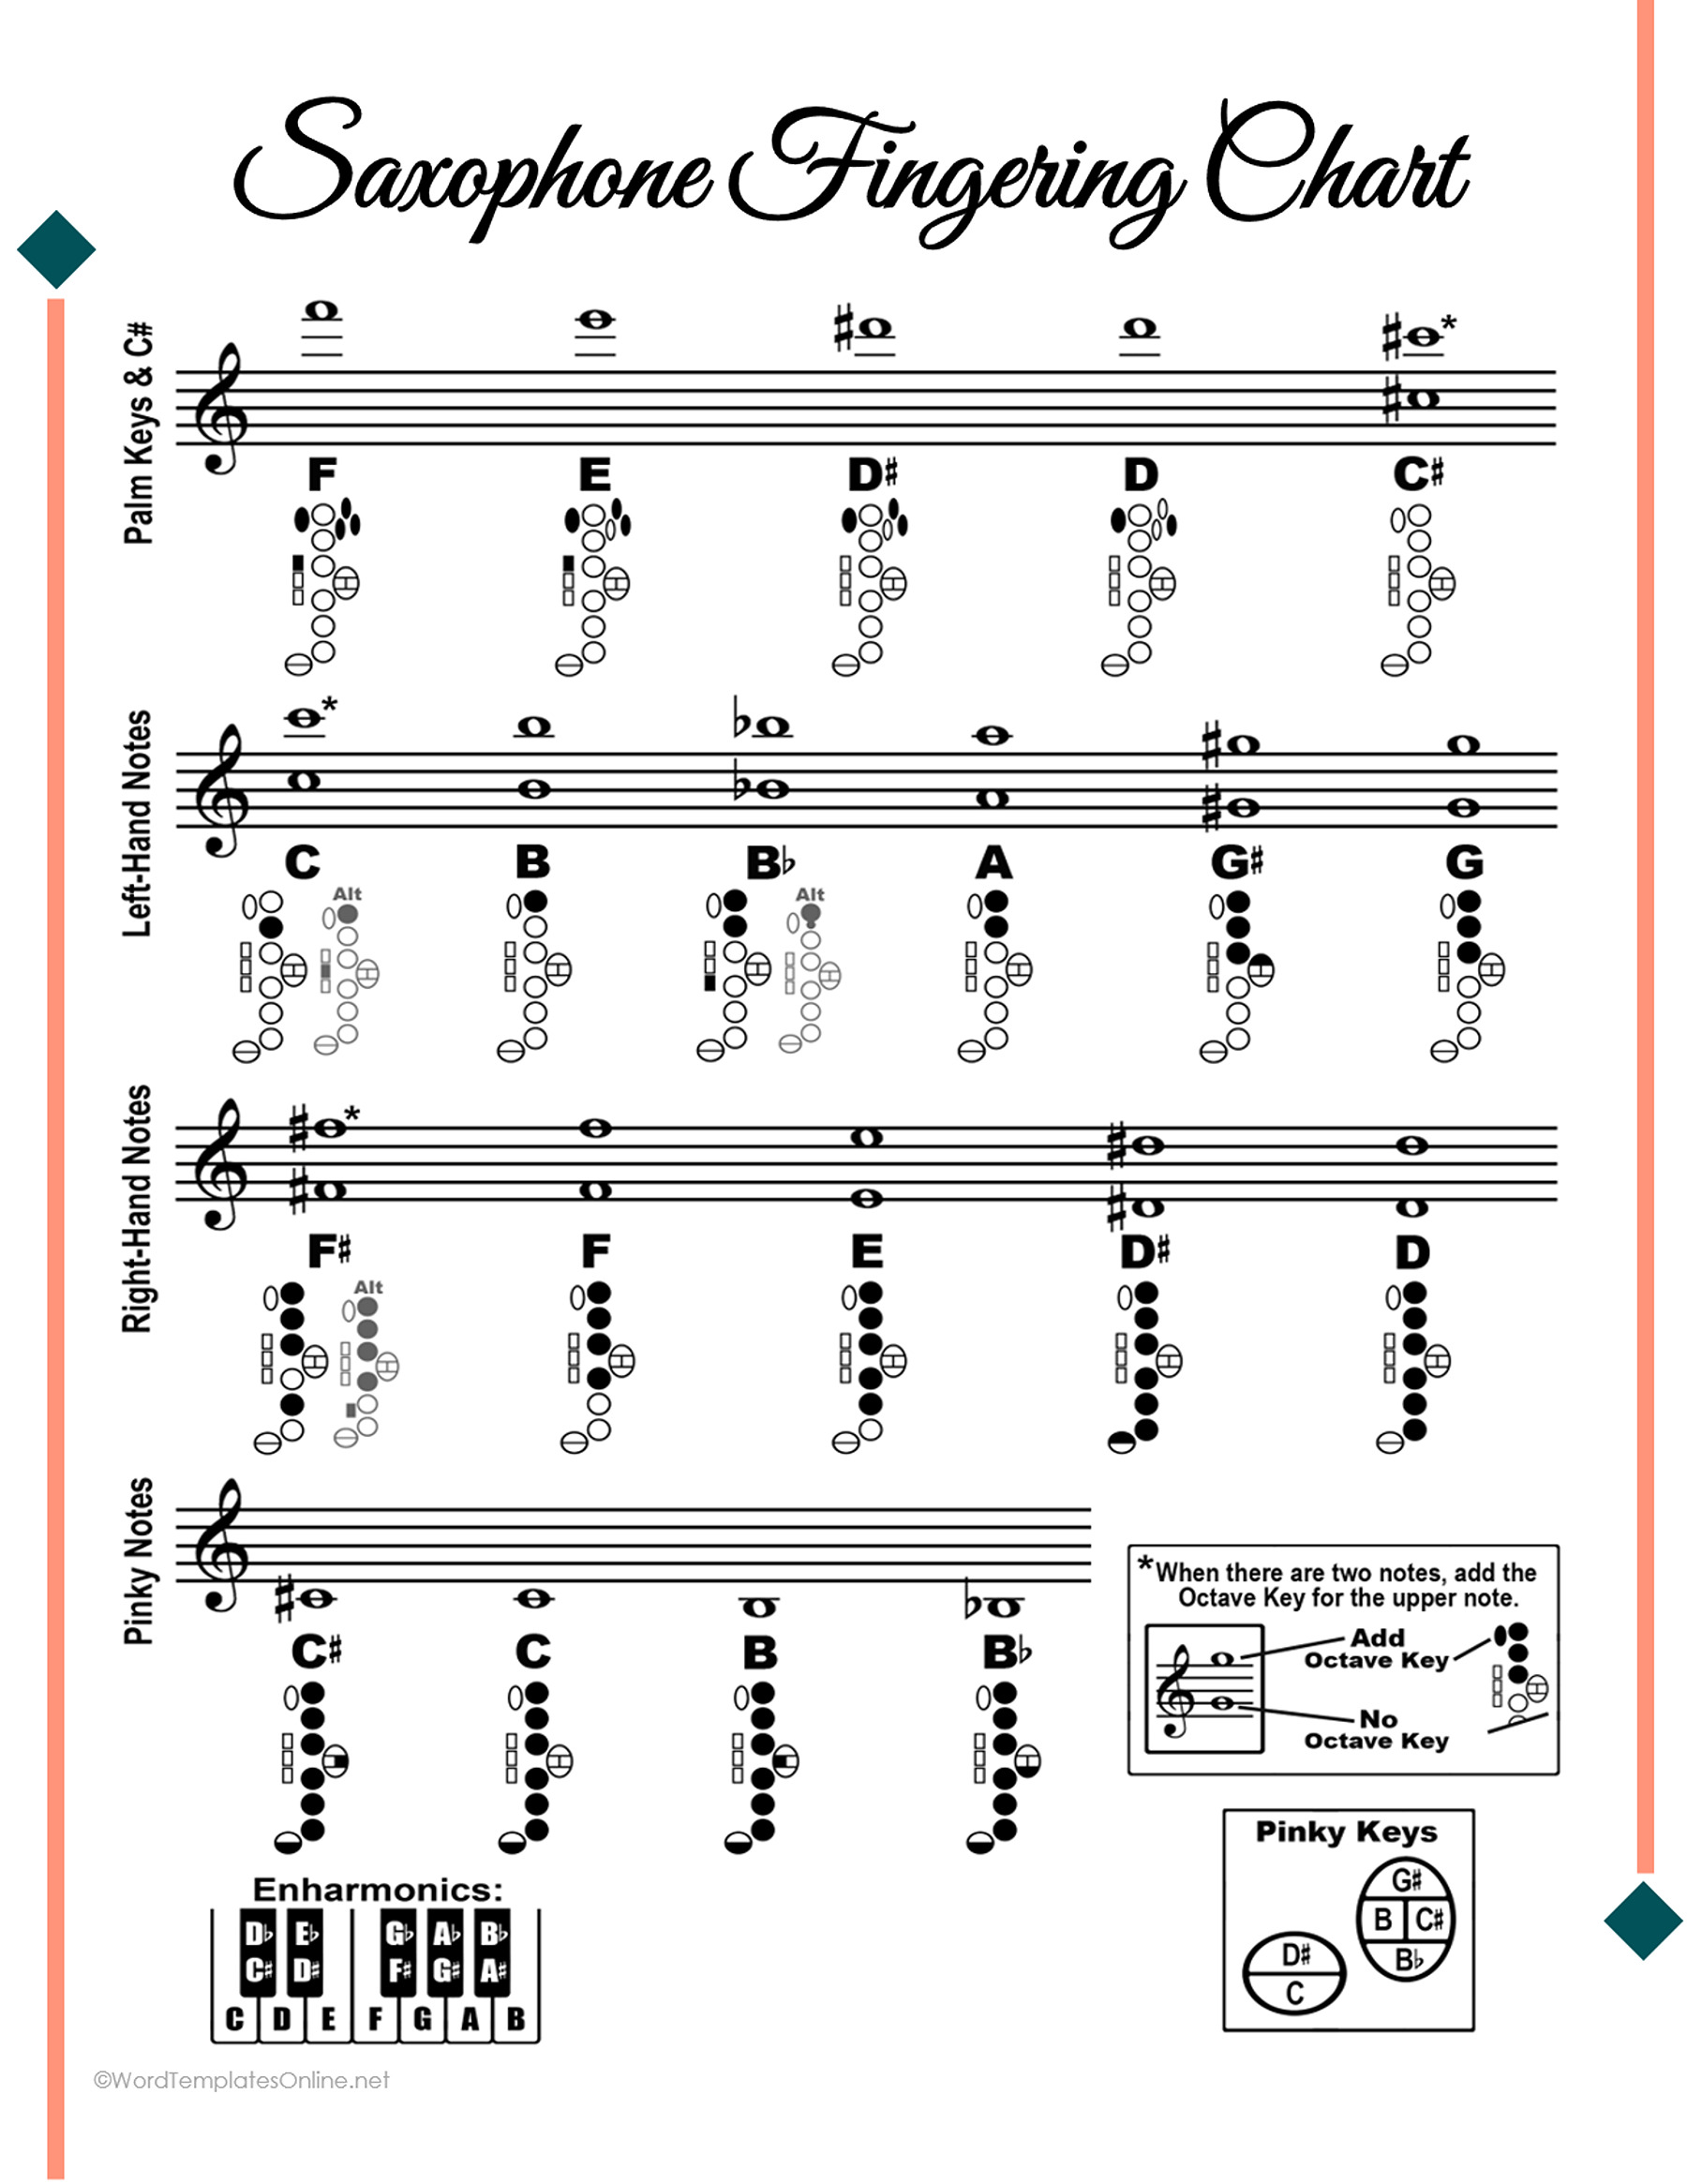
Saxophone Fingering Chart
Trombone
The trombone chart connects bass-clef notes and partial rows with slide-position columns numbered 1–7. Find the staff note in its row and read across to the associated position.
The slide drawing is a schematic reference. It is not a physical ruler for locating every position or a calibration of your instrument’s intonation. Use it with the position guidance you are learning in rehearsal or lessons.
Trombone Slide Position Chart
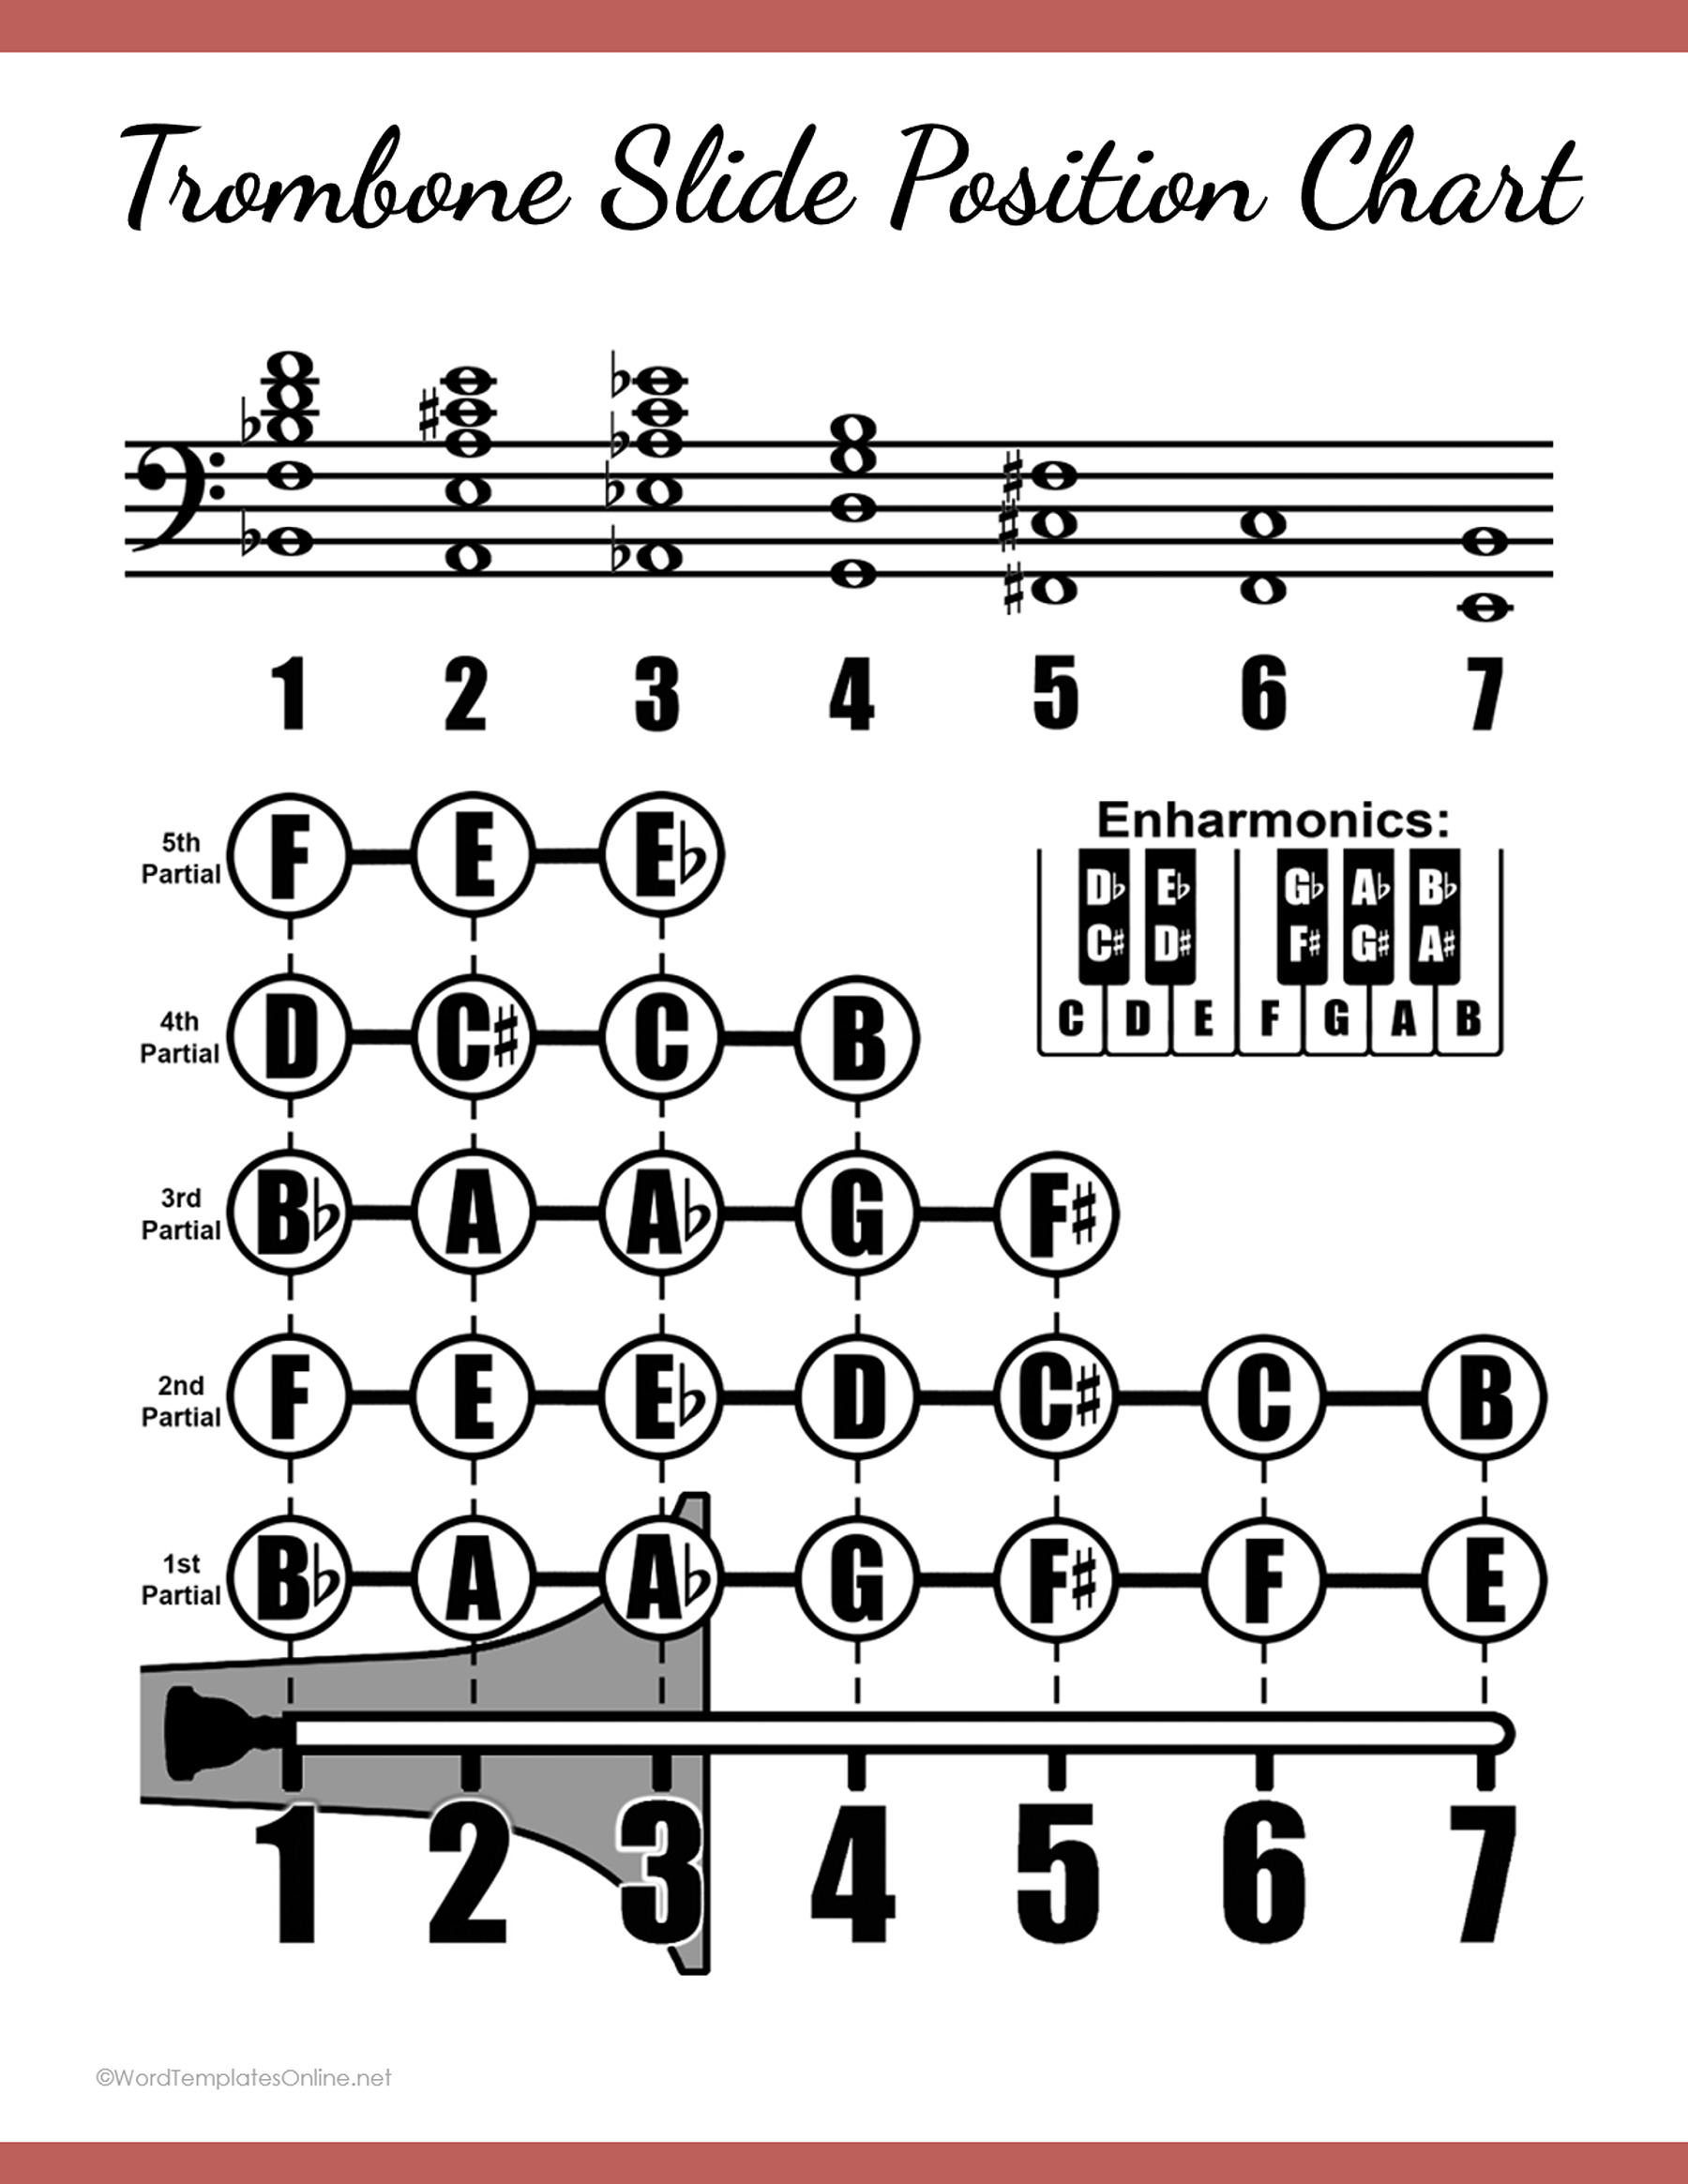
Trombone Slide Position Chart
Trumpet
This treble-clef chart connects notes in partial rows with valve combinations. In a numbered three-valve pattern, 1-2 means pressing valves 1 and 2 together while leaving valve 3 released; 0 means no valves are pressed. The combination example explains the numbers without assigning an additional note to the chart.
Read the staff entry too. Several brass notes can share a valve pattern, so the pattern alone does not specify the register. Yamaha’s trumpet diagrams offer another reference for three-valve combinations and alternatives.
Trumpet Fingering Chart
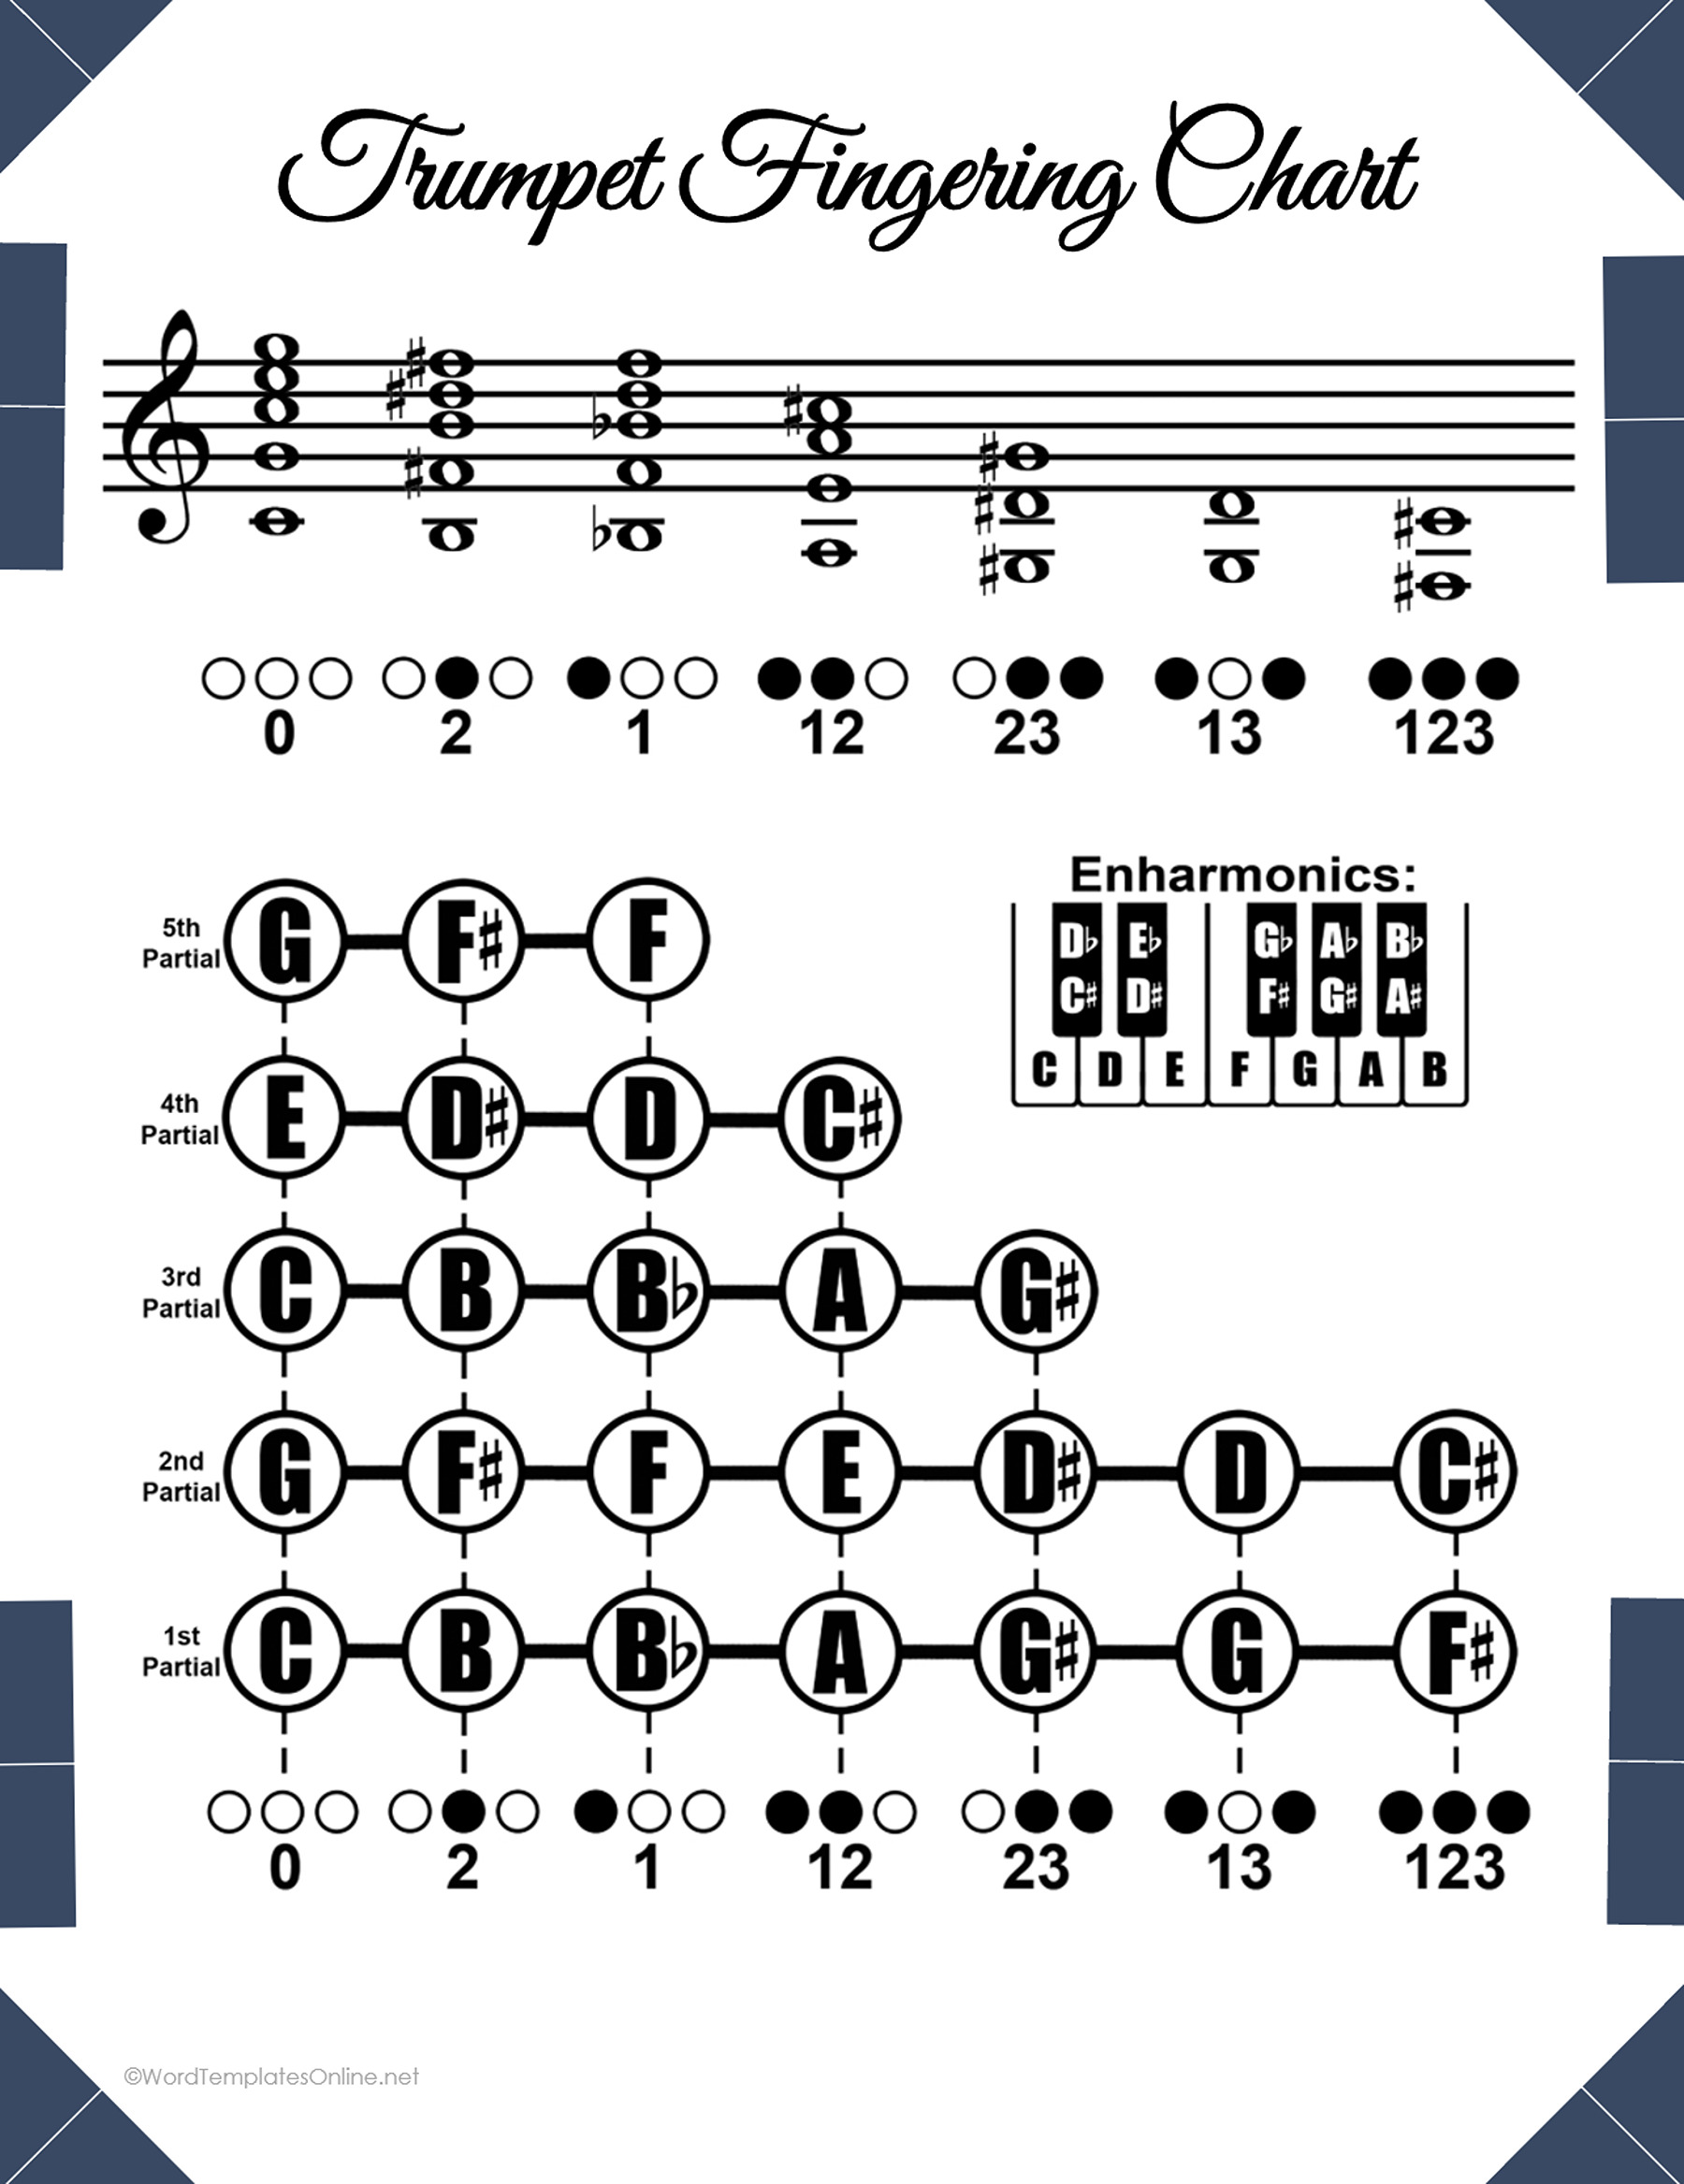
Trumpet Fingering Chart
Tuba
The tuba reference uses bass-clef notes and partial rows, with gray fourth-valve alternatives. Read those alternatives in relation to the note and your valve setup.
The offered title does not specify the instrument key. Confirm an appropriate reference for your tuba rather than assuming this one graphic covers B-flat, C, E-flat and F instruments.
Tuba Fingering Chart
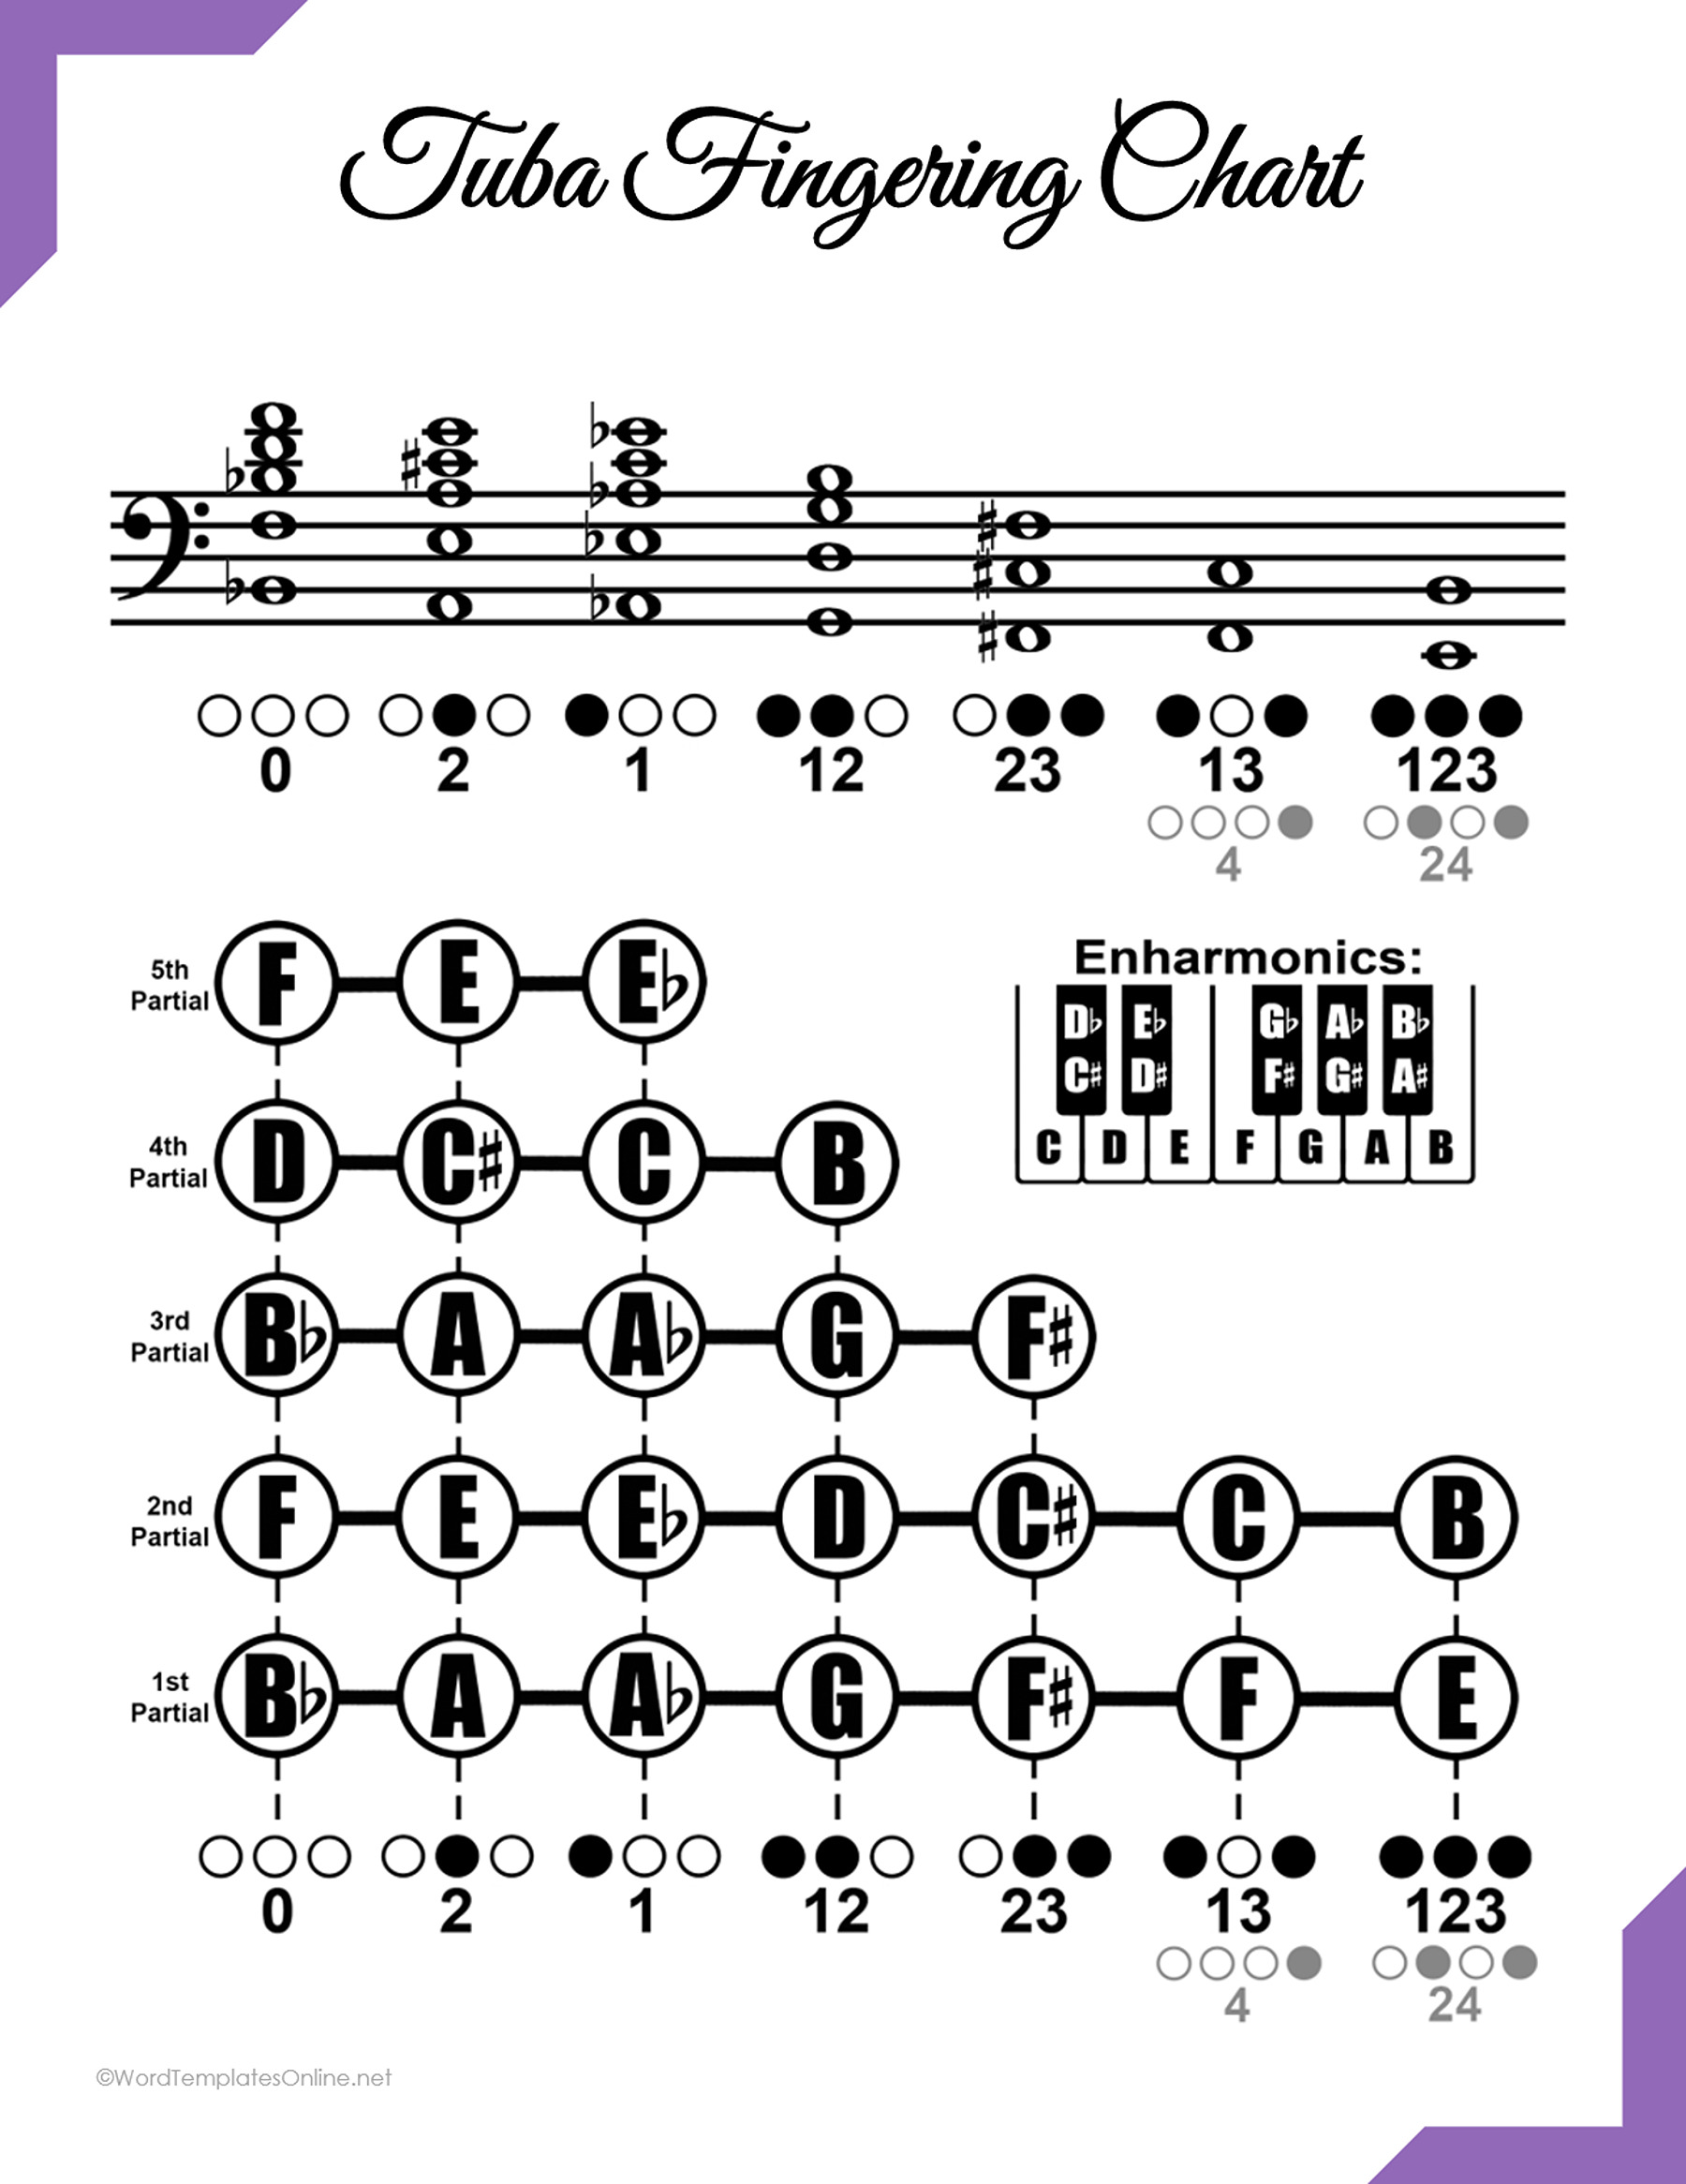
Tuba Fingering Chart
Read the legend and the register together
Each family asks you to connect different information. For brass, read the valve pattern with the staff note and partial row. For woodwinds, include the thumb, pinky, octave or other small instruction beside the key diagram. For trombone, match the slide position to the displayed note and register.
Follow the legend of the chart you are using. A shaded woodwind key should not be interpreted by borrowing a circle convention from a trumpet chart. If a symbol is unexplained or an entry is unclear, consult a reference your teacher can identify for that instrument and passage.
Choose a file for your lesson or reference copy
Use the DOTX Word template when starting a document in Word, the ODT file in an editor that supports OpenDocument text, or the linked Google Docs option for a browser-based copy. The gallery images are previews of the charts.
The main diagrams are principally flattened graphics. Surrounding titles may be separate text, but the document format does not make every note, key or valve symbol an independent editable field.
Inspect the small annotations at the size you intend to use or print. Then choose the chart for your instrument, locate one clear entry from the part, and confirm its system, register and interpretation. You can use that same process when you return to the reference for another note.
About This Article